
A template in ShuffleKit is a pack: a set of finished designs, the columns those designs read, and usually a few sample cards so the designs have something to show. Adding one copies all of that into a project of your own. Your copy is yours, and later changes by the template's author never touch it.
You can start from a template in three places: the public gallery at /templates, the Templates panel inside the Design editor, and the last step of onboarding when you create your first project. This tutorial walks through each one, then covers replacing the sample cards with your own data and publishing a template of your own.
Browse the gallery
Open Templates in the site's top bar, or go to /templates. The page has three parts:
- Browse by type: one tile per collection, such as trading cards, tarot cards, board game cards, game boards, print and play games, flash cards, and score sheets for Yahtzee style, Farkle, Bunco and other games. Each tile says how many templates it holds and opens a page listing them, with a how-to and the print sizes for that kind of component.
- ShuffleKit originals: every template we made, as a grid of previews.
- How ShuffleKit templates work: the four steps from picking a template to printing it.
Click any preview to open that template's page.
Read a template's page
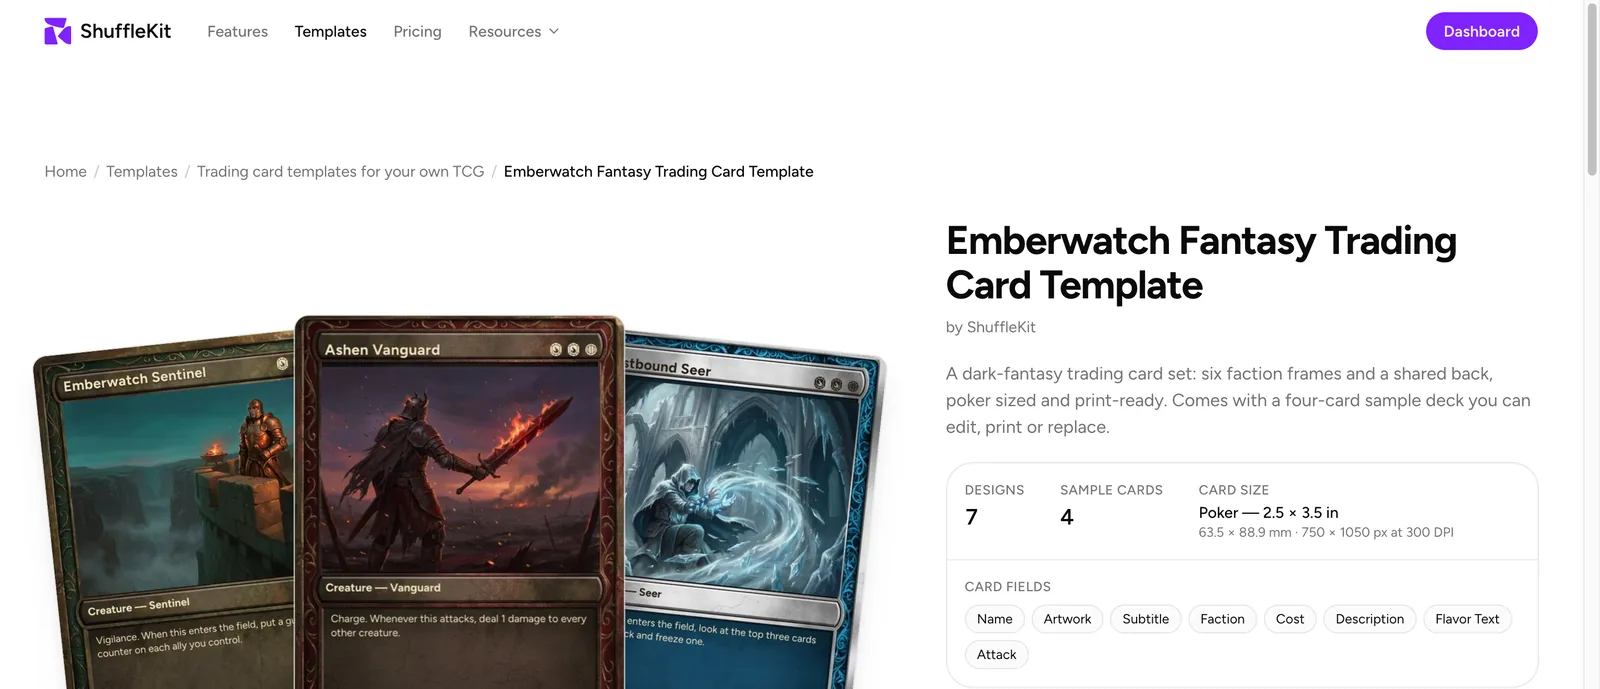
Each template page is at /templates/p/<template id>. Before you add anything, it tells you exactly what you'd get:
- The name, with by ShuffleKit under it for our own templates (or the author's name for one a ShuffleKit user published).
- A spec panel: the number of Designs, the number of sample cards (labelled for the pack's type, such as Sample cards), the Card size in inches, millimetres and pixels at 300 DPI, and the Card fields the designs read.
- The Use this template button.
- What's in the pack, in words and pictures: each design by name, every column, and how many rows arrive filled in.
- For a whole game, how to play it, and a printing section with the bleed size the export adds.
A pack with several kinds of component, such as a board game with a board and cards, lists each part separately. Report this template under the button sends us a note if something on the page is wrong.
Add the template to a project
Signed out, the button reads Use this template free and takes you to sign up. Create your account (email or Google) and ShuffleKit brings you back to the same template page with the add dialog already open, so you don't have to press the button a second time.
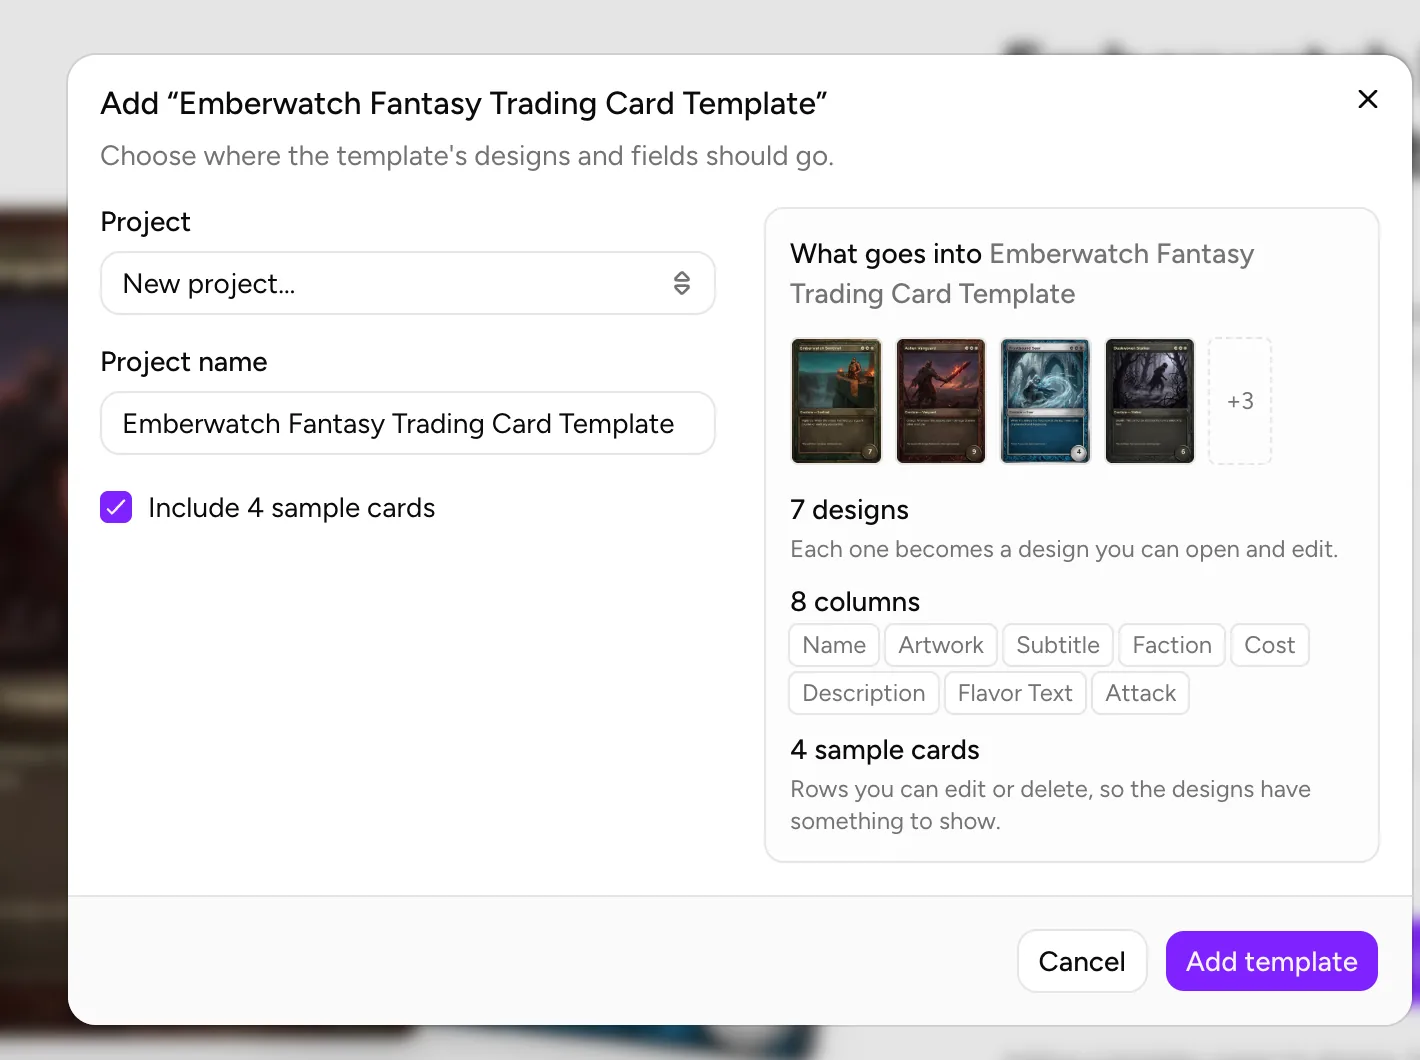
Signed in, the button reads Use this template and opens a dialog titled Add "":
- Under Project, choose where it goes. New project… is the default when your plan has room; your existing projects are listed below it.
- For a new project, check the Project name. It starts as the template's name.
- Leave Include N sample cards ticked to bring the sample rows, or untick it to start without them.
- Read the right-hand box, What goes into
, which lists what the add will do (below). - Click Add template. ShuffleKit opens the project on its Cards page.
A board pack added to a new project opens on the collection it made, since its boards aren't under All cards.
What gets added
The What goes into box shows design previews, then up to three rows:
- N designs: each one becomes a design you can open and edit, with the rules that send each card to the design made for it, and the card back.
- N columns: the pack's columns, shown as chips. These are added when the project has no columns of that type yet, which is always the case for a new project.
- N sample cards: rows you can edit or delete, so the designs have something to show.
Adding to a project that already has columns works differently. The box reads Uses the columns you have: no new columns are made, and the designs connect to the columns you have. Anything they can't match stays hidden until you connect it (see Connecting Properties to a Component Layout). The sample cards are left out, because they're written in the template's columns, and the checkbox greys out with a line saying so.
Designs and sample cards count toward your plan. If the pack has more designs than your plan has room for, the upgrade drawer opens instead of the add. If the sample cards would take you past your plan's card limit, the designs still arrive and the samples are skipped.
On the Free plan
The Free plan has room for one project, so a template can't start a second one. What the dialog offers depends on the project you already have.
Your project is a template you haven't changed. If you added a template and haven't touched its cards, columns or designs since, Project starts on Replace "
Your project has your own work in it. The dialog opens on The free plan has room for one project. with two buttons:
- Upgrade to keep both opens the plans drawer.
- Add to "
" shows the normal form with your project chosen. Adding keeps everything already in it and connects the new designs to its columns.
In the form, New project (free plan has one) is greyed out, and an Upgrade to keep both projects link sits under the options. See Manage Your Profile, Plan & Security for what each plan includes.
Replace the sample cards with your own
The sample cards are ordinary rows in the sheet. Edit them in place, or clear them out once your own data is ready:
- One by one: select the rows and choose Options → Delete N cards.... See Working With Cards.
- All at once: File → Clear all project items... deletes every item in the project and keeps your columns and designs. There's no undo, so export a CSV first if you might want the samples back.
- From a spreadsheet: File → Cards from CSV or Excel... imports your rows. Name your spreadsheet's headers after the template's columns and they map straight across. Before importing, check the column names on the template page under Card fields. See Import & Export.
Then rename columns, swap the artwork and move elements as you like. See Properties & Columns and Layout Editor: A Full Tour.
From inside the editor
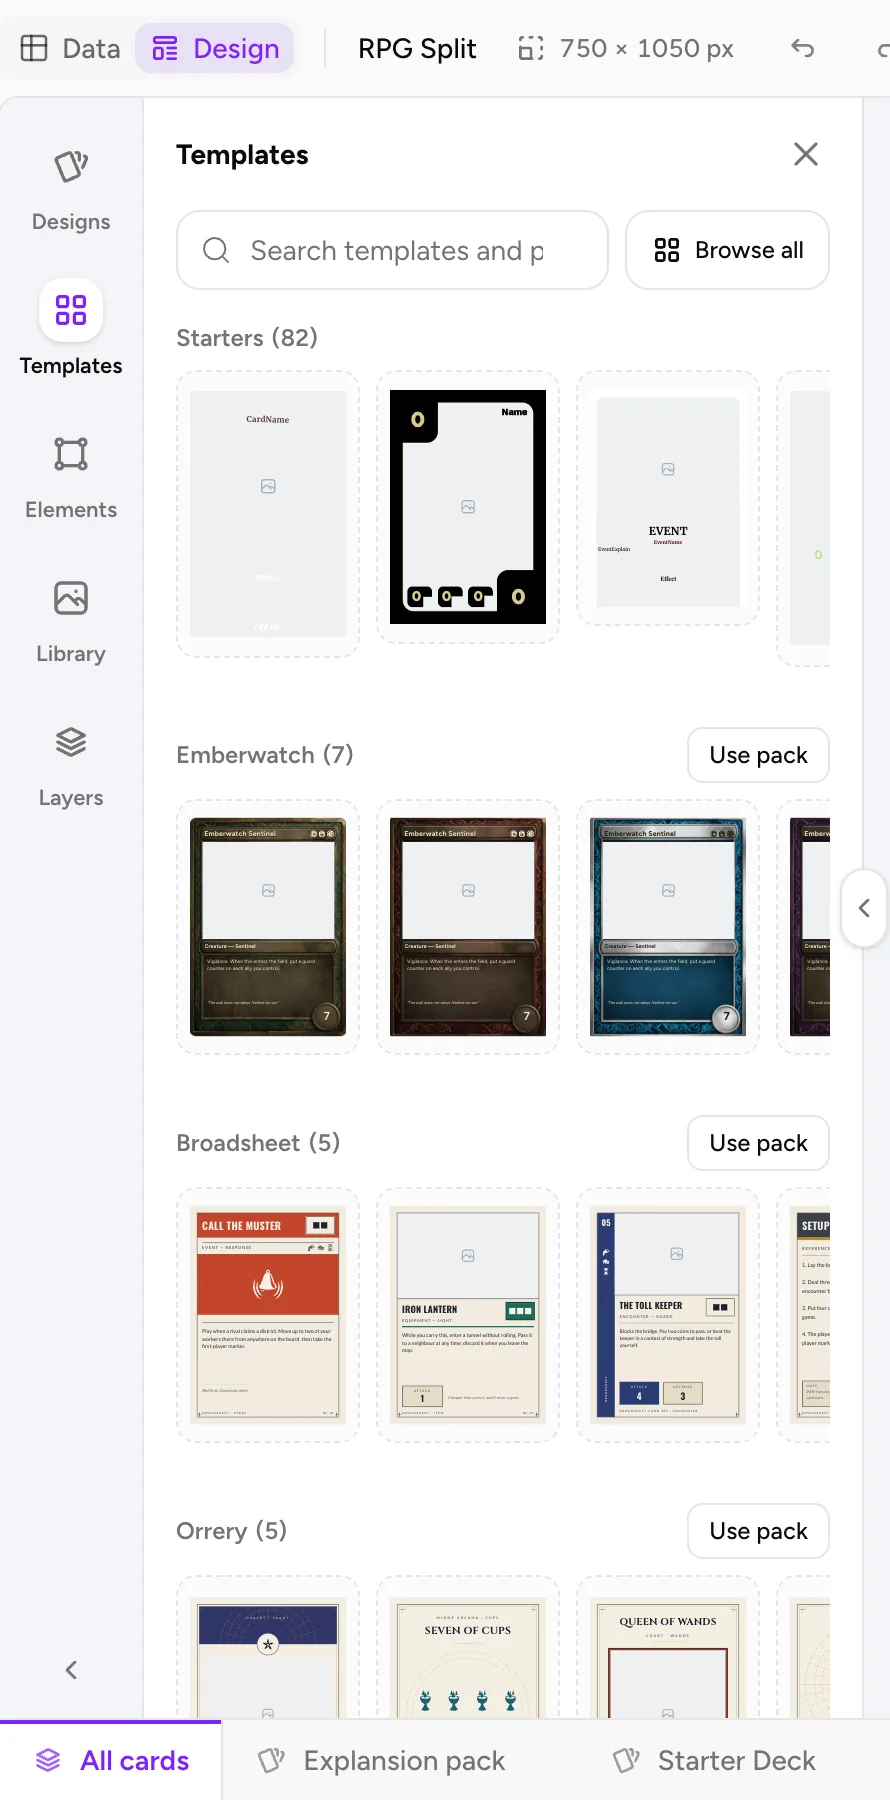
You don't need to leave a project to use a template. On the Design tab, open the Templates panel from the left rail:
- Search templates and packs filters the list.
- Starters is a row of single designs, led by your project's genre.
- Below it, each pack has its own row with a Use pack button. Click a single design to add only that one; Use pack adds the whole set to the project you're in.
- Browse all opens a full-window grid with a Show menu (All templates, Starters, Packs, each set, and Community packs, for templates other ShuffleKit users have published).
Use pack opens Use the
If your project is still exactly as a pack left it, Use pack offers two choices. Replace
During onboarding
When you create a project through onboarding, the Create with AI and Start empty paths end on a layout step with a Template packs section under the starter layouts. Picking a pack installs it whole. On the empty path, the Start with the pack's N sample cards switch is on by default; turn it off to start with one blank card instead. On the AI path, Shufflo writes your first cards into the pack's columns. See Create an Account & First Game.
Publish your own design as a template
If you own the project, you can share your designs as a template others can copy. Other people get their own copy, and your project stays private. There are two ways in:
- With the design open, click Share in the top bar, then Publish "
" as a template at the bottom of the dialog. - In Browse all, switch to Your layouts and choose Publish as template from a design's ⋮ menu.
The Publish as template dialog asks for:
- Designs: pick one or several. They publish as one template, boards and cards together if you pick both.
- Template name and Description.
- Visibility: Private (only you), Unlisted (anyone with the link) or Public (listed in the gallery).
- Whether to Include a few sample cards so the template demos with real data.
Click Publish, then copy the link it gives you. You can publish up to 3 templates a day.
To manage what you've published, open Browse all, choose Show → Community packs, and click My templates beside the heading. There you can change each template's visibility, copy its link, generate a new link (the old one stops working), open its public page or delete it. Deleting or hiding a template never affects copies people already made.











