
This tutorial follows the art from your computer, or from the AI, onto printed cards. Each step links to the tutorial that covers it in full.
Two kinds of picture
Decide first whether a picture changes from card to card.
- Different art on each card (a creature portrait, a location, a photo of a person) belongs in an Image column in the card sheet. Each card holds its own picture, and the design has an image frame connected to that column.
- The same picture on every card (a logo, a parchment texture, a border) goes on the design itself in Design. Open the Library tab in the left rail and click an image to place it, or drag it onto the canvas. Every card that uses that design shows it.
To set up per-card art:
- In the card sheet, click the + at the far right of the column headers (Add property), type a Column name such as
Artwork, pick Image as the Type and click Add Property. - In Design, add an image frame from Elements → Image, or select one the template already has.
- Click Connect data on the toolbar over the canvas and connect Image source to your
Artworkcolumn.
Steps 2 and 3 are covered in Connecting Properties to a Component Layout. Column types are in Properties & Columns.
One card at a time
Hover an empty cell in the Image column and it reads Click to upload. One click opens the Image library. Drop a file on it, click Drop images or click to upload, or pick a picture you uploaded before. The library takes PNG, JPG, WebP, GIF, SVG, AVIF and BMP files up to 10 MB each.
You can do the same from the card preview: click the picture on the rendered card, and the panel that opens has Add image, or Replace and Adjust once the card has one.
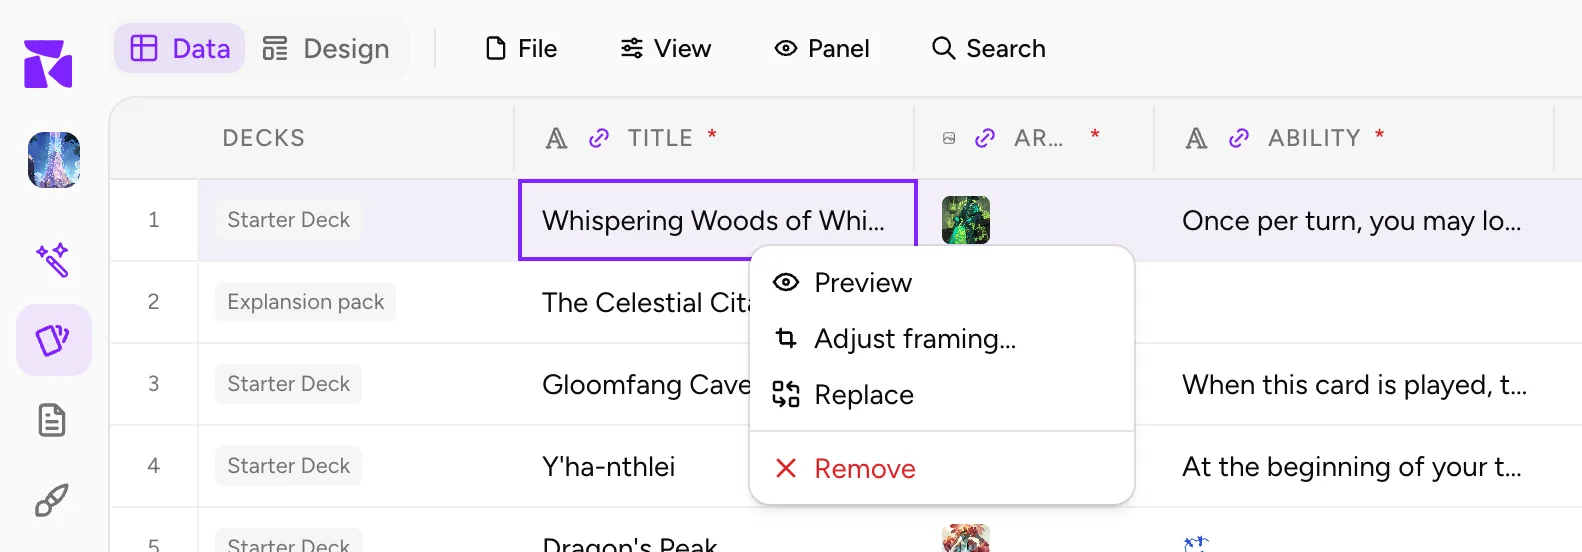
Once a cell has a picture, hover it and click the ⋮ for Preview, Adjust framing…, Replace and Remove.
A whole folder at once
When your art files are named after your cards (Fire Drake.png, card-07.jpg), you can fill the whole column in one go:
- Click the Image column's header and choose Add images by file name….
- Click Add images or Add a folder and pick the files. To use pictures you have already uploaded, click Use images from your library instead.
- The dialog shows how many cards get a picture and which images matched no card. Cards that already have a picture keep it unless you tick Replace pictures that are already there.
- Click the button at the bottom (it reads Add pictures to N cards).
Matching ignores capital letters, spaces, hyphens and underscores, so a card named "Fire Drake" finds fire_drake.png. It works on whichever column the file names follow: a name, a number or anything else. One undo takes every picture back off.
Pictures that come with a spreadsheet
If your cards are still in a spreadsheet, bring the art in with the rows. Open File → Cards from CSV or Excel..., and on the Map Columns step use the Card images panel: Add images or Add a folder, and each row gets the file named after it, or the file its sheet lists by name. The panel says which column it matched on and which column the pictures go in, creating a new one if needed. Cells that hold image URLs import too. The full import is in Import & Export.
Generate the art
There are three ways to have ShuffleKit draw art for you. All of them spend image credits: Free includes 30 a month, Hobby 80 and Indie 400. One image costs 1 credit on Gemini Flash and 5 on Gemini Pro.
- One card: right-click a single image cell and choose Generate artwork (or Regenerate artwork when it already has one).
- Many cards: ask Shufflo in the side panel. When some cards have no picture, a suggestion such as Add art to the 12 cards without it appears in a new chat. Shufflo draws up to 15 images a message and puts each one straight into the card's Image column. To change a card's picture rather than replace it, say what to change ("cover the eyes with the helmet") and it edits the picture the card has. Attach an illustration and it draws in that style. See Shufflo AI.
- Full control: open Generator from the sidebar and use the Manual tab to pick the model, an aspect ratio such as 2:3 (Poker Card), a style and up to 8 images at once. Everything you generate lands in your image library, ready to pick from an image cell. See Generate & Edit Game Artwork.
Shufflo always draws with Gemini Flash. For Gemini Pro, use the Generator's Manual tab.
Frame each card's picture
A picture rarely has the exact shape of its frame. With the frame's Fit set to Fill (fill the box, crop the rest), ShuffleKit centres the picture and crops the overflow. To move one card's picture inside its frame, open the image cell's ⋮ → Adjust framing…:
- Drag the picture, or use the Move horizontally, Move vertically and Scale sliders.
- Fit shrinks the picture so all of it shows. Reset goes back to centred.
- If the empty space reaches the bleed, a warning says it may print as a white edge after cutting. Zoom in or move the picture to cover that side.
- Click Done when it looks right.
The framing is saved on that card only and never re-crops the file itself. A picture placed on the design (the same on every card) uses Crop in the design toolbar instead, or a double-click on the picture. See Elements & Styling.
Remove a background or erase part of a picture
The Adjust framing… view also has Remove background and Eraser for that card's picture. On a picture placed on the design, the same tools are BG Remover and Eraser in the toolbar. The Eraser has three modes: Erase makes what you paint transparent, Remove object fills it in from what surrounds it, and Restore brings back the original.
Both tools save the result as a new image and leave the original in your library. They run in your browser. On Free you can try them and keep one result; saving a second asks you to upgrade. Hobby and Indie have no limit. See Manage Your Profile, Plan & Security.
Size the art so it prints sharp
Print needs 300 pixels per inch (300 DPI). ShuffleKit designs are already built at that scale: one canvas pixel is one printed pixel, so a Poker card (2.5 × 3.5 in) is a 750 × 1050 px canvas. The size shows in the Design header after the design's name.
So the frame decides how big a picture needs to be:
- In Design, select the image frame and open Position.
- Read W and H. That is the smallest picture, in pixels, that prints at 300 DPI in that frame.
A full-card picture on a Poker card needs at least 750 × 1050 px. A frame 600 px wide and 400 px tall needs at least 600 × 400 px. Bigger is fine. Zooming in with Adjust framing… shows fewer of the picture's pixels, so at a Scale of 2× the picture needs twice the width and height.
| Card size | Canvas, full-card art |
|---|---|
| Poker (2.5 × 3.5 in) | 750 × 1050 px |
| Bridge (2.25 × 3.5 in) | 675 × 1050 px |
| Mini (1.75 × 2.5 in) | 525 × 750 px |
| Tarot (2.75 × 4.75 in) | 825 × 1425 px |
| Square (3 × 3 in) | 900 × 900 px |
For any other size, multiply each side in inches by 300. Print & Ship's own pixel numbers (825 × 1125 for Poker) include the bleed, which ShuffleKit adds for you. See Print & Ship.
Before you print, ShuffleKit checks this for you. A PDF export and a Print & Ship upload both show "Print check: N cards may not print the way they look" when something is off. Its Details list includes Pictures under 300 DPI at the size they print, naming each card, the picture and the DPI it reaches. It is a warning only; replace the low-resolution files or zoom out in Adjust framing…, then check again. Shufflo can run the same check on a card when you ask it to look at one.











